1008ICT Business Informatics
Module 2 - Building Web Based Information Systems
Learning Outcomes: |
|
Additional Material
Relevance of this week's material
By building your own web-based information system you will discover alot of things about computers, software and communications over the Internet. We have all seen Web pages but you will experience how they are created and how they get transported onto a Web server where they can be viewed by everybody. The wonder of networking is that you can access other computers remotely, log in to them, query them and ask them for services. The additional material directly explains and demonstrates the sortware and the skills that you will need to complete your assessment exercises this week. You will:
- experience the WWW at a slightly more detailed level that will enable you to understand the underlying technologies and terms that you may only have heard of before now.
- experience a computer system that has a completely different operating system to the good ole' Windows or MacOS that you may be used to.
- experience the creation of a Web site and operation of a Web server
- experience a range of communication software and "protocols" that allow us to send information over the Internet
First let's catch up on the business world of the Systems Analyst
We will view a few of these slides to put you into the picture - there are more than we need for this introduction but feel free to read through them to get more depth. Here are the slides.
It's all about communication
How do we communicate? What are the rules?
- Face to face (multi-channel)
- Broadcast vs. conversation (one-to-many, one-to-one, many-to-one, many-to-many)
- In person but at a distance (sight only)
- Over a telephone (sound only)
- email (text only)
- Deaf people (other senses)
- Blind people (other senses)
How do computers communicate? What kind of human communication is it most like?
Protocol:
- (computer science) rules determining the format and transmission of data [syn: communications protocol] 2: (people) forms of ceremony and etiquette observed by diplomats and heads of state 3: (organisations) code of correct conduct; "safety protocols"; "academic protocol"
Source: WordNet ® 2.0, © 2003 Princeton University - A set of formal rules describing how to transmit data,
especially across a network. Low level protocols define the
electrical and physical standards to be observed, bit- and
byte-ordering and the transmission and error detection and
correction of the bit stream. High level protocols deal with
the data formatting, including the syntax of messages, the
terminal to computer dialogue, character sets, sequencing of
messages etc.
Many protocols are defined by RFCs or by OSI.
Source: The Free On-line Dictionary of Computing, © 1993-2005 Denis Howe
Web/Internet protocols
What is the difference between the Internet and the Web?
The Internet is a planet wide collection of interconnected networks used for computer communication. Networks are made up of transmission media (cables, radio waves, fibreoptics, IR, etc), network communication devices (telephones, modems, routers, hubs, switches, etc) and computers. It can be divided into private (intranets, extranets) and public parts.
Every device that is connected to the Internet is uniquely identified (hardware identification) and has a unique address (IP address).
Communication over the Internet can be broken down into a hierarchy of perspectives. Each perspective or layer has a set of rules that govern its own communication and has a set of requirements and services.
- Human to human (web pages, emails, file transfers, chat, messaging, newsfeeds)
- Computer to computer (end-to-end communication)
- Communication device to communication device (point-to-point or link)
- Type of communication medium being used (microwave, radio, fibreoptic, wires, etc)
These perspectives are reflected in a network reference model called the TCP/IP network model.
Application Layer
Web browsers, email clients, file transfer clients, remote terminal clients, etc
TCP Layer
- End-to-end transmission of messages
- Breaking messages into individually identified chunks that are manageable
- Message reconstruction
IP Layer
- Point-to-point transmission of chunks between network "nodes"
- Breaking messages into individually identified "packets" within an allowable size range
- Reconstructing chunks
Hardware Layer Bits and bytes to frequencies, voltages, currents, phases, pulses, etc
Each perspective relies on a range of communication and processing rules, called protocols to manage the effective and efficient transfer of information from one person/computer/device to another over the Internet.
The Protocols that you are most likely to use every day relate to the different application programs that you use to transfer information back and forth. These are programs like browsers, chat and email clients. A very short selection appears in the table below:
HTTP
HyperText Transfer Protocol
A set of rules for sending and receiving Web pages SMTP
Simple Mail Transfer Protocol
A set of rules for sending email messages from one email server to another POP
Post Office Protocol
A set of rules for transfering mail between an email client (outlook, pegasus, etc) and an email server (the email equivalent of a Post Office) FTP
File Transfer Protocol
A set of rules for transfering files between computers IMPPmess
IMPPpresIntant Messaging and Presence Protocols
A set of rules for sending instant messages between messaging clients and for signalling online presence This site gives an exhaustive range of Internet related protocols.
So what is the difference between the Internet and the Web?
The Web or World Wide Web (WWW or W3) is the hugest document repository in the world and is a system for storing, transmitting, linking and viewing Web pages and operates under the HTTP protocol.
Internet Protocol Demonstrations
The Internet Protocol (IPv4) has an addressing system that assigns a unique IP address to each computer on the Internet. An IP address looks like 132.234.16.5 and each of the four numbers separated by dots can be between 0 and 255. That means that there are 255x255x255x255 = 4228250625 (4 billion) unique IP addresses available. A quick think will reveal that there are not enough IP addresses to go around each of the devices that are connected to the Internet in the world today. IPv6 allows alot more addresses and there are various ways that many computers inside corporate firewalls can share just a few IP addresses. IP addresses are pretty hard for people to remember so we use handles called URLs or Universal Resource Locators. To you and me that is a Web address like: www.gbcycles.co.uk or www.victoriassecret.com
1) IP: There is a utility called "ping" that allows us (to ping a computer) to see if a computer connected to the Internet is currently "awake" or accessible. To use it first ensure that Netcheck is on so that you can get information through the university firewall then go to Start-> Programs -> Accessories -> Command Prompt. At the C:> prompt type the word ping followed by a web address that you know (or try one of the above) eg: ping www.victoriassecret.com
What is it doing? The first thing that happens is that the URL is transformed into its equivalent IP address by looking it up in a Domain Name Service (DNS). Next the Ping program sends 4 small packets of data to the remote host (web server in this case) requesting that they be sent back immediately. The round trip time is recorded and averaged. A ping packet only has a limited time to live and will time-out after a fixed number of milliseconds or after too many hops to intermediate hosts on the network. "Ping" basically lets you know that the computer is on and it is accessible via the network.
2) TCP: There is a related utility called "tracert" that traces the route that packets take to get to the final destination. There are several different routes that a packet could take to get from one computer to the destination computer with many intermediate steps inbetween. If a particular host is not responding or if the transmission times are too long at a particular time then packets may be rerouted to another host so that they can continue their journey. It is possible to run tracert twice and get two different results. At the C:> prompt type the word tracert followed by a web address that you know, eg: tracert www.victoriassecret.com
What is it doing? Again the URL is transformed into its equavalent IP address and then a program or device called a "router" determines the next host (may be a router) to send the packet to. At each new host the packet is delivered to a router with its destination address and return address. Each host from start to destination sends back its IP address and some packet timing information. In this way one can tell the currently most efficient or effective route from one computer to another.
The Application Layer
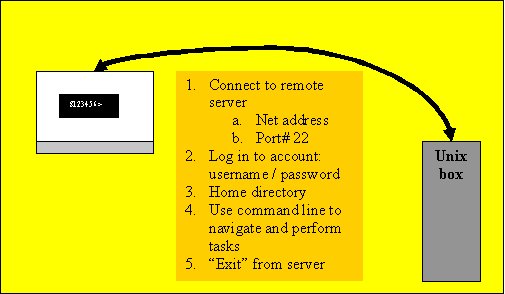
Remote Access using Telnet or PuTTY
We all use Windows in the labs and on GU computers. We authenticate to Novell to prove that we are a registered student or staff member and then we are allowed to use that computer for as long as we need. During that time there is noone else logged into that compter, only you. This is what is referred to as a "single user system". We have sole access to the computing power and resources of that machine while we are logged in.
Unix and Linux and some other operating systems are "multi-user" systems. Accounts can be created for a number of users and they can simultaneously access the computer's processing capabilities and storage. Users are usually remote from the actual computer so they must have a remote means of interacting with the operating system. The system is also multitasking, meaning that several processes or programs can run at the same time by sharing the computers processing time between tasks (and users). This process is called process "scheduling".
Telnet and Putty allow us to remotely access a multi-user machine using a text based interface. That means that we must execute actions using a command line. So long as we stay within our designated "home" directory we can do just about anything with that computer. Here is a basic picture of what we are doing with Telnet and PuTTY:
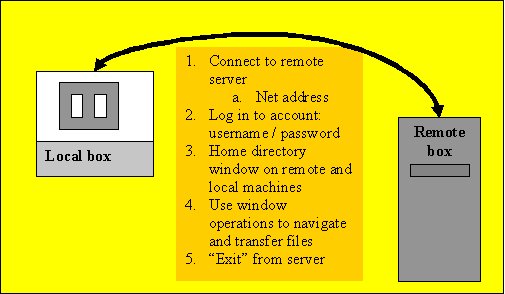
FTP - File transfer to and from a remote computer
File transfer allows us to do just that: transfer files between two computers that we have access to. The usual configuration is a local and a remote computer. Often, a developer will be creating files on a local machine and then later "uploading" them to a remote computer that provides some service like publishing web sites. If editing an existing site for which there is no local copy then the files that make up the site may be "downloaded" to the local computer.
From the local FTP client perspective, uploading is referred to as "putting" or executing a PUT operation. Downloading from the remote to the local machine is called "getting" or executing a GET operation. There are a range of FTP operations that allow transfer between text-based interfaces and they include navigating between directories on local and remote computers and defining the type of data that is being transferred so that optimal settings may be used.
File transfer clients like WinSCP3 implement the FTP file tranfer protocol as outlined in the TCP/IP suite.
Creating a basic Web page - HTML in the raw!
Online HTML computer labs and resources
Relationship between computers based on their roles
The key words in this discussion are "Servers", "Clients" and "Peers". On a network whether it is the world spanning Internet or just a small local area network (LAN) computers and their programs take on particular roles with relative levels of importance. A Peer-to-Peer network has computers that each assume the same level of importance: a Peer-to-Peer relationship. A Client-Server relationship is an unequal relationship where the server is far more powerful and has access to much faster communications to supply services to many usually lower-specced clients.
Peers: As the name suggests, computers that are peers in a network share the same level of importance and may be identical in function and utility. A Peer-To-Peer (P2P) network is made up of any number of computers that work together and share resources but none has any special role compared to the others. Imagine a handful of computers around an office or connected via the Internet that share hard disk space, a printer, and a set of communication programs to facilitate interaction.
Servers: This term has two different but related meanings. A server often refers to a type of computer that has hardware specifications that make it most efficient at network communication, hard drive access and has exceptional computational power. Server hardware is most often used to run software that provides a particular service over the Internet or the local intranet (even an extranet). Often a server provides its service to multiple requestors in a many to one relationship.
Software applications that may be considered a "service provider" or a "server" include things like a Web Server (HTTP), Email Server (POP, SMTP), Network News Server (NNTP), File Server (FTP) and other similar applications. Services can include things like access to databases, authenticating users, remote log ins and a range of other things. The key thing here is that a server accepts requests for the service that it specialises in and then performs the service. A Web Server, for example would accept a HTTP request for a particular web page and then send it to the requesting entity (client). In high traffic situations where there are many requests for service being executed in a short period of time the server hardware needs to be of highest specification. In extreme cases a single server/service may be executed by multiple computers at once providing what is termed a "server farm".
Because servers are the distributors and often storage points of important information they may be kept physically secured and are regularly maintained by people like Systems Programmers and Database Administrators.
Clients: Again, the term "client" can refer to computers at the hardware level or to the particular software that the computer runs. Client computers often take the form of workstations and their mode of operation is to communicate with servers to get the information and services that it needs to complete user tasks. At GU all of the computers that reside in labs and on desktops in offices throughout the university are what would be considered clients. They have amongst their application programs various items of communication software that are "client" applications. You would not be surprised to find out that for each server application there is likely to be a client application. For example, a web client is a Web Browser (HTTP), an Email client would be an application like MS Outlook (POP), a file transfer client would be an application like WinSCP (FTP) and a remote log-in client would be an application like PuTTY. All a client does is sends requests for service to a server at the user's initiation and then receives and displays the response to that request.
Setting up a Web page on Dwarf
Dwarf is the student Web server and it is used so that students can create Web pages for viewing within the university. It is used for other things as well but that is what we are going to use it for. Dwarf runs a version of the Unix operating system so we are going have to learn a little bit about Unix too.
Dwarf is physically located at the Nathan campus which means that we have to remotely log in to it in order to perform any tasks. We can do this with a secure TTY application like PuTTY. A what? TTY is an abbreviation of the word "teletype" and means typing over a distance. Rather than learn a whole new language for using the Unix operating system on Dwarf, we will set up our websites using the secure FTP application called WinSCP3. Not only can we transfer our files to Dwarf but we can create directories and manage our security so that our web pages become accessible via a browser while on Dwarf.
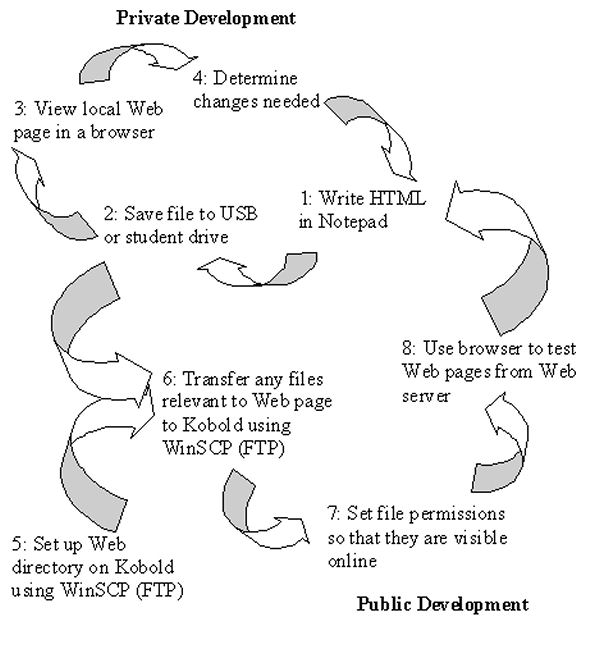
The process for developing web pages is cyclic and progresses as follows:
1 Create HTML code locally (on a lab computer) using a text editor 2 Save it to the local disk (USB) or removable drive (*.html) 3 Test the webpage/website locally using a browser
(refresh the browser)4 Upload the finished webpage to your public_html directory on the remote Web server using secure FTP (WinSCP) 5 Make sure that all web pages, images and documents have permissions set to 644 and make sure that any subdirectories that you create have permissions of 705 or 755 6 Test the webpage on the remote server - dwarf.cit.griffith.edu.au/~s123456/ - using a browser (refresh the browser) 7 Edit the HTML code locally 8 Go to 2 Browsers will save a copy of a recently visited file in a memory location called a cache. This is to save time if you are reaccessing a file that you have been to recently. A browser will look in the cache for a local copy first then go the website if it cannot find one. When repeatedly editing and testing a web page it is important to force the browser to go and get the most recent copy of the web page. This is done with the browser's "refresh" button.

Using secure FTP to transfer files from Windows to Dwarf
If the computer that you are using does not have a secure FTP (File Transfer Protocol) application then right click on this link and select "Save target as" to download a copy of WinSCP3.
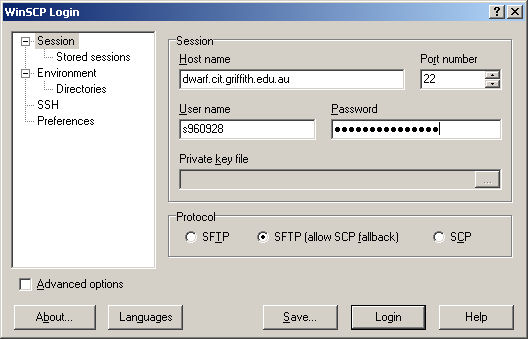
Execute WinSCP3 from its icon and you will get the following log in script. Fill in the fields with the appropriate information and press the "Login" button to connect. The "Private Key File" field will gray out once you start to enter the password for your connection to Dwarf.
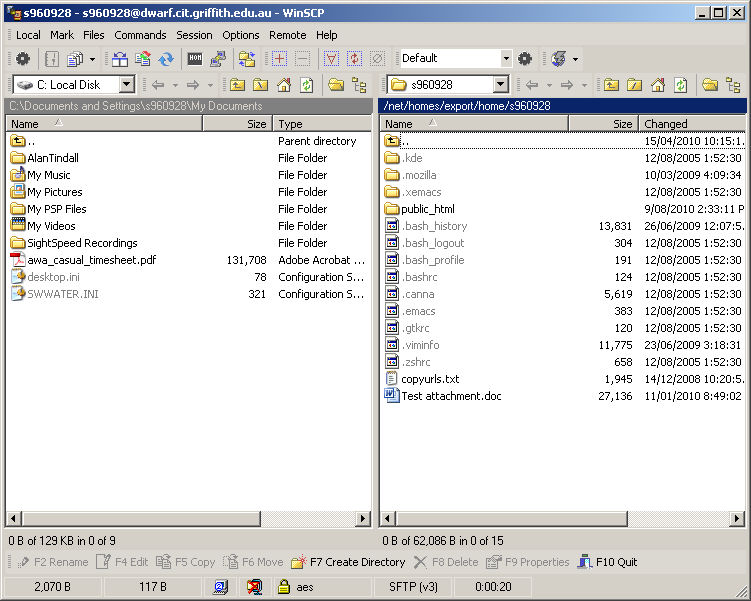
A window with two panes will open up. The left pane represents the file system on your PC and the right pane the file system on the remote server (dwarf). You can navigate by clicking on folder icons on either pane and move files between machines simply by dragging and dropping or by using the appropriate buttons at the bottom of the window. Similarly you can change drives on the local PC by using the drop down menu on the tool bar above the lefthand pane.
Basic (but really, really important) rules:
- Always save the file that you are editing (in Notepad) before you transfer the file to the server. If you don't save the file first then it is the last version of the file that goes to the web site.
- Never edit your web page by accessing the code using the "view source" function on IE.
- Never "click" on files in the WinSCP windows expecting to access files on the remote computer - all you ever get is the local copy and really confused when it doesnt work properly.
- Never use Dreamweaver or Netscape Composer to create your web pages as they add code that we dont need for this exercise.
The Bottom Line - All you really need is WinSCP to manage your Web site
Many of the file management items that you would normally use a secure telnet appliction like PuTTY to complete can be done using the graphical interface of the WinSCP application. This is so much easier for Windows users - "Thank heavens" say a few hundred students. So how do you do the important stuff to get the website up and running?
Setting up your dwarf web area
- Run WinSCP3 and log on to your dwarf account
- Make sure that the left (local) window is showing the contents of the folder holding your current week's work on your USB drive or network drive – basically, where ever you have created your local files
- In the right window: Double click on the up arrow folder (top) on the dwarf (right) window to access the list of student home directories (this could take a few seconds)
- When the list appears in the right hand window, right click on your home directory ('s' followed by your student number) “s123456” and select “properties” from the drop down menu
- Make sure that your home directory has the permissions 0701 so that:
- Owner (you) has R W X permissions,
- Group has --- permissions
- Others (nobody = web server) has - - X
- Once that is done double click on your home directory to enter it and make sure that you have a “public_html” directory. If you don’t have one then create one using the “F7 Create directory” button or menu option and make sure that it is spelled exactly as above.
- When you do have a public_html directory, right click on it to make sure that it has permissions 0755.
- Owner (you) has R W X permissions,
- Group has R - X permissions
- Others (nobody = web server) has R - X
- Into the public_html directory on dwarf you should drag and drop all of the html, image and word documents that you have created on you USB or network drive – this should include your home page which should be named “index.html”
- When they have all of the files transferred they should set all of the permissions 0644
- Owner (you) has R W - permissions,
- Group has R - - permissions
- Others (nobody = web server) has R - -
- Fire up an IE session and point the browser at: http://dwarf.cit.griffith.edu.au/~s123456 so that you can see your index page, alternatively http://dwarf.cit.griffith.edu.au/~s123456/index.html will do the same or http://dwarf.cit.griffith.edu.au/~s1234546/myblog.html will bring up your blog page and will work with whatever html files that you have.
Stick around for some simple examples of how to build web pages. You will be writing HTML in no time and having heaps of fun creating your websites. Just to get you started here is a basic outline for a web page. Get ready to take down some notes in the mass computer lab after the lecture/workshop.
	  <html>
            <head>
	      <title>Text for title bar</title>
              <!--No HTML code in the head of the document-->
            </head>

            <body>
              <!--HTML comments dont appear in the browser-->
              <!--In this section you can put tables, lists, images, links and everything that appears on your web page-->


            </body>
	  </html>
Two Tier Web Architecture
This is most commonly known as a client-server architecture. Host computers such as dwarf provide web services to other computers through their Web server. On local computers such as those at home or in the labs you use a browser to make a request for a Web page stored on a remote computer. The server then responds to your request by sending a copy of the required file. The client level and the server level make up two tiers of the Web architecture. A third level or tier is added when the Web server requests data from a different server such as a database to make dynamic Web pages.
Each of the applications (IE, WinSCP, PuTTY, etc) uses a particular protocol or set of rules for the transmission of the data that it specialises in. When you use IE you are communicating with a remote Web server. When you use WinSCP you are communicating with a remote FTP server. Similar things happen for email (POP Mail server), instant messaging and news services.
1) The term "server" is most often used to refer to a computer (hardware device) that hosts the service. Server computers are different to the basic desktops and laptops that we see every day in that they have extremely fast hard drives and internal communications and have extremely efficient network connections to deal with multiple requests for service.
2) The term "server" is most correctly used to refer to a piece of software that runs on that computer. Web servers, email servers, FTP servers and all of the rest are programs that run continously waiting for and responding to requests for an information service. In actuality, server computers are powerful enough to run many different servers at the same time if required. This sort of makes sense as you need to access and FTP server to upload files to dwarf and a web server on the same machine to view the Web files that you have uploaded.
Local computers at home and in the labs take the role of "client" computers. In effect they run several different client programs to request email, web pages, FTP operations and many more.
Resources List:
- Shelly, B.G., Cashman, T.J., Rosenblatt, H.J., "Systems Analysis And Design: Sixth Edition", Chapter 6, "Internet Resource Tools", Thomson Course Technology pp626-653
- Internet Resource Tools: PowerPoint Slides
- Schneider, G.P., Evans, J., "The Internet: 5th Edition - 2005 Update", Thomson Course Technology
- HTML Computer Lab YouTube videos - Remember to turn NetCheck on first
Topics 1
Things not to copy from this video
|
|
Topics 2
Things not to copy from this video
|
|
Topics 3
Things not to copy from this video
|
|
Topics 4
Things not to copy from this video
|
|
Topics 5
Things not to copy from this video
|
|
Topics 6
Things not to copy from this video
|
|
Topics 7
Things not to copy from this video
|
Updated by Heather Gray Feb 2011