Images, Image Maps and Multimedia Objects
Most images used on web pages are of two types denoted by the file suffixes
".jpg" (or ".jpeg") and ".gif". Digital images
are information rich and can take up alot of memory space. To reduce the amount
of memory required to store images and the amount of time needed to download
them over network connections, image files are compressed by subjecting them
to a reversible mathematical process. The different image file suffixes refer
to the type of compression algorithm used and the resultant file format. GIF
stands for Graphics Interchange Format
and JPG (or JPEG) stands for Joint Picture Experts
Group.
Digital images have what is called a natural "aspect ratio". The
aspect ratio of an image is the ratio of width to height of the original image.
Often this is expressed in pixels in a WIDTH x HEIGHT relationship. Ultimately
the
The <IMG> tag
Web browsers allow for images to be inserted into any part of the HTML text.
As such, images are referred to as "inline" images and their position
relative to the text is specified by use of the <IMG> tag's attributes
or properties. In its most basic format the actual image to be used is indicated
by the tag's SRC attribute. The source attribute could point to a local file
in the same directory as the HTML file being viewed,
<IMG src="filename.gif" />
or in another directory,
<IMG src="../images/filename.gif" />
or to another URL on the web.
<IMG src="http://cittie.student.gu.edu.au/images/filename.gif" />
Other <IMG> tag attributes determine how the image is rendered by the
browser.
Tag or
Attribute |
Description |
| <IMG> |
Used to insert an inline image object into the document |
align="option"
(left | right | top | texttop | middle | absmiddle | baseline | bottom
| absbottom )
|
Specifies the alignment of the image relative to surrounding
text. Alignments of "left" or "right" align images
with browser window margins. |
alt="text" |
Alternative text to be displayed if the browser cannot display
the image. This feature is important for text only browsers. |
border="value" |
Specifies the size of the border around the image measured
in pixels. |
controls |
Displays VCR-like controls with moving images. (See dynsrc
attribute) |
dynsrc="document" |
Specifies the file for a video, AVI or VRML object shown within
the document. |
height="value" |
Specifies the height of the image to be displayed. Plain integer
values specify the absolute height in pixels. Integer values followed
by a '%' character specify that the image height should be a percentage
of its container height. Eg table, window, frame, etc. |
hspace="value" |
Amount of space to the left and right of the image in pixels |
ismap |
Identifies the graphic as an image map for use with server-side
image maps |
longdesc="URL" |
URL of a document that contains a description of the image
displayed. |
loop="value" |
Specifies the number of times that a moving image must be
played. "value" should be an integer or the constant INFINITE |
lowsrc="document" |
A low resolution version of the document that the browser
should display imediately before loading the high resolution version |
src="document" |
Source of the inline image. This attribute is the only one
that is required for every IMG element. |
start="item" (fileopen | mouseover) |
Tells the browser when to start animating a moving image.
FILEOPEN indicates as soon as the page is loaded. MOUSEOVER indicates
when the mouse pointer moves over the image. |
suppress="option" (true | false) |
If SUPPRESS is set to TRUE then the image placeholder and
ALT text is suppressed until the image file is located. |
usemap="#mapname" |
Specifies the map name (<MAP name="mapname">)
to be used with the image that is being used as a client-side image
map |
vspace="value" |
Amount of space above and below the image in pixels |
width="value" |
Specifies the width of the image to be displayed. Plain integer
values specify the absolute width in pixels. Integer values followed
by a '%' character specify that the image width should be a percentage
of its container size. |
Let's see examples using some of the attributes covered above:
alt
This is used to provide a text description of the image
and is vital for interoperability with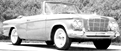 speech-based and text only
browsers.
align
This specifies how the image is positioned relative to
the current textline in which it occurs:
align="top"
positions the top of the
image with the top of the current text line.
align="texttop"
positions the top
of the image with the top of the current text line.
Browser programs vary in how they interpret this. Some only take
into account what has occurred on the text line prior to the IMG element
and ignore what happens after it.
align="absmiddle"
aligns the middle
of the image with the midline for the current textline.
align="middle"
aligns the middle of
the image with the baseline for the current textline.
align="absbottom"
and aligns
the bottom of the image with the lowest point of the text line. This is
usually the bottom of the descenders on p's and q's).
floats the image to the current left margin,  temporarily
changing this margin, so that subsequent text is flowed along the
image's righthand side. The rendering depends on whether there is any left
aligned text or images that appear earlier than the current image in the
markup. Such text (but not images) generally forces left aligned images
to wrap to a new line, with the subsequent text continuing on the former
line.
temporarily
changing this margin, so that subsequent text is flowed along the
image's righthand side. The rendering depends on whether there is any left
aligned text or images that appear earlier than the current image in the
markup. Such text (but not images) generally forces left aligned images
to wrap to a new line, with the subsequent text continuing on the former
line.
align=right  floats the image to the current right margin, temporarily changing this
margin, so that subsequent text is flowed along the image's lefthand
side. The rendering depends on whether there is any right aligned text or
images that appear earlier than the current image in the markup. Such text
(but not images) generally forces right aligned images to wrap to a new
line, with the subsequent text continuing on the former line.
floats the image to the current right margin, temporarily changing this
margin, so that subsequent text is flowed along the image's lefthand
side. The rendering depends on whether there is any right aligned text or
images that appear earlier than the current image in the markup. Such text
(but not images) generally forces right aligned images to wrap to a new
line, with the subsequent text continuing on the former line.
Note that some browsers introduce spurious spacing with multiple left or right
aligned images. As a result authors can't depend on this being the same for
browsers from different developers or different versions. See the <BR>
tag for ways to control text flow.
width
Specifies the intended width of the image in pixels. When given together
with the height, this allows browsers to reserve screen space for the image
before the image data has arrived over the network. This allows the text
to be placed before an image has downloaded - the page will seem to load
much faster if your user has some content to review.
The image, above has a natural aspect ratio of 361 pixels wide x 253 pixels
high. In this case the width and height attributes of the image tag are
ignored so the browser will render the entire image at its natural size.
If an <IMG> tag has either the width or
height attribute set then the other attribute is adjusted to keep the image
in its true or natural aspect ratio.
|
|
|
|
width="150"
|
width=50
|
height="150"
|
Of course it is possible to override the natural aspect ratio by adjusting
both the height and width attributes independently.
|
|
|
|
width="150"
height="200"
|
width="50"
height="100"
|
width="400"
height="150"
|
Using the '%' indicator can have unpredictable results as different browsers
tend to render this in different ways. Some versions of Netscape render
the above image as 25% of the entire browser width whereas IE will render
it as 25% of the container width. In this case the container is a table
data element.
height
Specifies the intended height of the image in pixels. When given together
with the width, this allows browsers to reserve screen space for the image
before the image data has arrived over the network. Example above.
border
When the IMG element appears as part of a hypertext link, the browser program
will generally indicate this by drawing a colored border (typically blue)
around the image. This attribute can be used to set the width of this border
in pixels. Use border="0" to suppress the border altogether. Browser
programs are recommended to provide additional cues that the image is clickable,
e.g. by changing the mouse pointer.
|
|
|
|
|
border="0"
|
border="5"
|
border="10"
|
hspace
This can be used to provide white space to the immediate left and right of
the image. The HSPACE attribute sets the width of this white space in pixels.
By default HSPACE is a small non-zero number.
vspace
This can be used to provide white space above and below the image The VSPACE
attribute sets the height of this white space in pixels. By default VSPACE
is a small non-zero number.
In the example above, the hspace setting is easily discerned by viewing
the distance between the left hand edge of the table element and the lefthand
edge of the image. The vspace is discerned as the image pushes away the
edge of the white container element.
usemap
This can be used to give a URL fragment identifier for a client-side image
map defined with the MAP element.
ismap
When the IMG element is part of a hypertext link, and the user clicks on the
image, the ISMAP attribute causes the location to be passed to the server.
This mechanism causes problems for text-only and speech-based browsers. Whenever
its possible to do so use the MAP element instead.
Images and links
Images may be included in anchor tags so that the image itself becomes a
clickable link.
 |
ie: no anchor |
When an image becomes a link a coloured border region becomes visible around
the image on the Web page.
|
ie: anchor
<A href="index.html"><IMG src="uparrow.gif"></A> |
You could remove the blue border by setting the image border attribute to
0. Like this:
|
ie: anchor but no border:
<A href="index.html"><IMG src="uparrow.gif" border="0"></A>
|
Image Maps
Image maps are graphics which have hot spots or links on them which direct
the user to resources or locations by clicking on areas of the image. You
provide a map of the graphic to tell the browser which coordinates of the
image lead to which location. There are two types of image maps you can use
- server side and client side. Server side maps require access to a server
and are more complex than client side maps, which are interpreted by the browser
itself. Client side maps are the recommended choice. Below is a client side
image map:
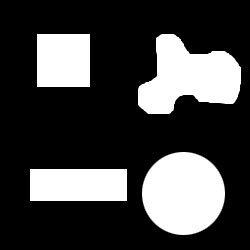
The code for the above map looks like:
<IMG src=imgMap.gif
width="250" height=250" usemap="#mymap" border="0"
>
The image is defined normally, but the usemap attribute tells the
browser to use the image map called 'map'.
The code for the map itself is a little more complicated:
   <MAP name="mymap">
    <area shape="rect" coords="37,35,94,85" href="IMDemo1.html" alt="Hot Spot 1" title="Hot Spot 1">
    <area shape="rect" coords="31,169,133,201" href="IMDemo2.html" alt="Hot Spot 2" title="Hot Spot 2">
    <area shape="circle" coords="192,195,41" href="IMDemo3.html" alt="Hot Spot 3" title="Hot Spot 3">
    <area shape="poly" coords="188,36,198,49,219,53,240,51,250,61,256,78,252,94,245,103,234,105,220,101,210,
                               100,201,97,193,97,185,101,181,110,176,115,163,115,153,111,147,99,147,88,154,80,
                               164,80,168,73,166,63,166,52,168,41,171,33,178,34,176,35"
          href="IMDemo4.html" alt="Hot Spot 4" title="Hot Spot 4">
   </MAP>
The <MAP>...</MAP> tags are used in conjunction with client-side
image maps and they describe the "hotspots" in the image. The <MAP>
tags must contain <AREA> tags, one for each different hotspot in the imagemap.
Areas, Coordinates and Shapes
<AREA> tags have the attributes of shape="shapename",
coords="coordinate-set", alt="aternate-text",
href="URL" and a title="title-name"
to name the defined area.
The shape sets the shape of the hot spot (poly stands for polygonal - many
sided). The coords defines the precise position of each hot spot in pixels.
The href and alt attributes behaviour is as normal for anchors
and images.
- rect - x1, y1, x2, y2
The rectangle shape is defined by the top left (x1, y1) and bottom
right (x2, y2) corners of the rectangle in pixels. So the coords
of the rectangle, 'Hot Spot 2' above, "30,169,127,201" set the top
left corner as being 30 pixels left and 169 pixels down, and the bottom
right corner is 127 pixels left, 201 pixels down.
- circle - x, y, r
A circle is defined by marking the centre (x, y), and then the
radius(r). The coordinates of the circle above, 'Hot Spot 3', "184,194,40"
define the centre as 184 pixels from the left and 194 pixels from the
top. The radius is 40 pixels.
- poly - x1, y1, x2, y2, x3, y3...
A polygonal object is defined by specifying the coordinates of each corner
of the object. So the polygonal shape "171,115,148,114,etc...etc..."
defines corners at 117 pixels from the left, 115 pixels from the top,
148 pixels from the left, 114 pixels from the top and so on.
Resources
There are several tutorials to help you make your own image maps:
There also some tools that will assist in constructing a map. It is easiest
if you use one of these programs:
Embedded Multimedia Objects
Browsers are enhanced by the installation of specialist software systems
called "plug-ins". To execute any multimedia object other than an
image file requires access to either the operating system's standard applications
or to plug-ins installed to execute/view that object type. Within a web page
multimedia objects can either be linked to by using the anchor <A>...</A>
tags, or are "embedded" within the page using the <EMBED>...</EMBED>
tags. Multimedia objects include sounds, animations, streaming files and movies.
Audio files (sound!)
Sound files cannot be played by the browser software itself. No doubt
this feature will be added before too long. Including a sound file into
a Web page requires HTML code like this.
<A href="tada.wav">The standard windows 'tada!'</A>
The standard Windows 'tada!'.
Clicking on the link either plays the file, if the browser can handle it,
or it allows you to save it to the hard drive, where it can be played with
an external program.
Navigator and Internet Explorer versions 2.0 and later can deal with audio
files differently. Sounds can also be placed with the embed tag, this places
the file in the browser with a small control panel.
<EMBED src="tada.wav">The standard windows "tada"!</EMBED>
<EMBED> has certain attributes that can be applied:
src = url
The url of the source file.
width = value
Specifies the width of the embedded document, in pixels.
height = value
Specifies the height of the embedded document, in pixels.
parameter = value
Optional parameters to send to different audio plug-ins. Examples of parameters
are play_loop = true, which loops your sound and controls = false,
which hides the control box (with the play, stop and volume controls). Parameters
are specific to each plug-in.
The embed tag does not work with some earlier browsers (in particular,
Internet Explorer 2.0)
This is an embedded sample of the 'tada!' sound file and its execution.
You will notice that the Netscape media player plays the sound file if that
particular "plugin" is loaded. If no sound plugin is loaded then an
instance of the media player native to your operating system is spawned to
play the file.
There are many different sound file formats. For Windows the WAVE file
(*.wav) above, is the most common. Other common audio file formats
are:
- RealAudio is a proprietry format developed by Real
Networks. RealAudio and RealVideo are streaming media formats, meaning
that the content can be displayed as it downloads, instead of the user having
to wait for the entire file to finish downloading before it can be heard or
viewed. Real Networks focuses on selling enhanced versions of their players
and encoders, as well as server software. However, free versions of all their
basic players, encoders and server software are available from the RealNetworks
website.
- MPEG3 Audio (*.mpg)
Mpeg Layer 3 (MP3) is an audio format that has revolutionised the way sound is presented
on the web. It offers very high quality while maintaining small file sizes.
Presently, there is no way to embed an mp3 file in your web page. You should
use an anchor <A> tag with the "href=" attribute pointing
to the file to be played. The file must be saved to the hard drive and listened
to with an external player. The Winamp
Mpeg3 Player is one of the most popular programs for playing MP3 files.
It is possible to serve streaming MP3s from your web page if your server has
the correct software, which allows your visitor to hear the sound file almost
instantly instead of waiting for the whole file to download. Checkout Shoutcast.com
for details on the server software required and how to serve streaming MP3s
from your page. There is an Mpeg
Faq to outline some of the details of the format.
- MIDI sequences are dependent upon hardware
support (Soundblaster card) in PCs
Midi stands for Musical Instrument Digital Interface. It was originally used
as a means to get synthesizers and digital musical equipment to communicate
with each other. Midi differs from other formats in that is does not actually
contain any sounds, but rather tells the computer hardware what notes and
instruments to play and when. this means that midi file sizes are much smaller
than their straight audio counterparts. Unfortunately, MIDI has the habit
of sounding really bad. The sample file provided is Jimi Hendrix's All Along
the WatchTower, believe it or not..
Video files (movies!)
There are several formats of movie that are available online. These are discernable
by their file suffix (extension).
- Windows Audio Visual format - *.avi
- ISO Motion Picture Experts Group - *.mpg, *.mpeg
- Apple Quicktime Movie - *.mov
The Quicktime streaming format has been incorporated into the MPEG -4 specification
for use with audio-visual applications on wireless networking environments.
Quicktime movies are played with either a stand-alone application or a browser
plug-in.
The Windows Media Player can be used to play most other multimedia movie
formats. Again, embedded files are played within the browser by a plug-in
and all others cause the Media Player application to be launched as a separate
window.
Streaming Media World has a comprehensive guide
to video on the web using both Windows and Macintosh programs.
Flash Animations
Macromedia's Shockwave Flash (now Adobe) is an
animation format gaining wide acceptance for delivery of Web-based animation.
The relatively low-bandwidth of Flash's vector-based animation format makes
it ideal for adding extra life and interest to a web-site. Flash can be used
to create anything from simple rollover buttons to fully animated cartoons
and interactive games.
It is worth recognising, however, that many people still have restricted
bandwith that makes loading Flash-enabled sites slow. If you intend to use
Flash on your site, you should plan to offer a version without Flash. In addition,
visitors to your site may not have access to the necessary browser plug-in
to run Flash animations. You can use JavaScript to detect this and offer links
to the Macromedia site where people can download and install the plug-in if
they wish. If you are using a recent version of Flash, you may also need to
check that the user's browser has the most recent version of the plug-in installed.
To get started with Flash, work through this introductory
tutorial from FlashKit. Take some time to experiment and become familiar
with the concepts of Flash. Your next step might be to use Flash to create
animated buttons for your website. There is another FlashKit tutorial on building
buttons.
Here are a few examples of what can be done with Flash: