Creating a HTML Document - Containers
A web document is highly structured and can be thought of as a set of "containers". The document itself is the outermost container and is bounded by the <HTML>...</HTML> tags. Contained directly within the <HTML> tags are the document head, the document body and sometines text comments for the benefit of the page's maintainer.
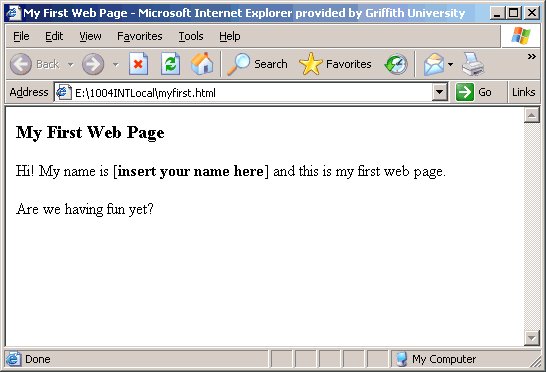
Exercise 1. Open a new document in Notepad or some similar text editor program and insert the following text:
<HTML>
   <HEAD>
       <TITLE>My First Web Page</TITLE>
   </HEAD>

   <BODY>
       <H3>My First Web Page</H3>
       <P>Hi! My name is [<B>insert your name here</B>] and this is my first web page.</P>
       <P>Are we having fun yet?</P>
   </BODY>
   <!--Comments can appear anywhere to help the reader with maintenance-->
</HTML>
To view the file that you have created:
- Save the file you have just created in a new directory, as "myfirst.htm" (or myfirst.html)
- Open the directory and double click on the file to execute the default
browser to view the file. It should look something like this:
If you find that you have made some mistakes:
- Go back to the text editor, make your changes and save the file again.
- Go back to the browser and press the "Reload" (or "Refresh") button to view the changes.
Some things to notice about HTML are:
- Tags are elements contained in angle brackets "<...>"
- Tag pairs have an opening <...> and closing </...> part
- The <HTML>...</HTML> container holds a document HEAD and document BODY
- The <HEAD>...</HEAD> container holds elements such as the title <TITLE>...</TITLE>, metatags and dynamic HTML scripts (later!)
- The <BODY>...</BODY> container holds all other HTML tags and data elements
- The <TITLE>...</TITLE> tags contain text that appears in the title bar of the browser
- The <H3>...</H3> tags denote that the contained text will appear as a level 3 heading (level 1 is the largest, level 7 the smallest)
- <P>...</P> tags are text formatting agents and contain a PARAGRAPH of information followed by an empty line
- <B>...</B> tags are text presentation (emphasis) agents and contain text that should appear bolded.
- In a "well-formed document" tags must be completely contained
and cannot overlap ie;
- <P>...<B>...</B>...</P> is OK
- <P>...<B>...</P>...</B> is NOT OK
- In a "well-formed document" every opening tag (with some exceptions) <...> must have a corresponding closing tag </...>
- HTML is not case sensitive: <P> is the same as <p> and <p>...</P> is perfectly legal code.
From a general code quality point of view:
- HTML code is easier to maintain and read by people if it is effectively formatted using levels of indenting to indicate extent of containers.
- Comments for human readers can be inserted anywhere in the file and are contained within <!--...--> tags.
- It must be pointed out that a browser will just as easily read and
identically render the above document if it were typed as follows:
<HTML><HEAD><TITLE>My First Web Page</TITLE></HEAD><BODY><H3>My First Web Page</H3><P>Hi! My name is [<B>insert your name here</B>] and this is my first web page.</P><P>Are we having fun yet?</P> </BODY><!--Comments can appear anywhere to help the reader with maintenance--></HTML>
- Readability is enhanced if all tags are written in the same style eg. all in capitals (as above) or all in lower case. In most cases capital letters stand out from the majority of text and make tags easier to find.
Basic Syntax -Tags and Attributes
Many HTML tags can be made more flexible by use of attributes. An attribute is a variable value that is used to adjust some aspect of the appearance of the contents of the tag and appears as part of the opening tag structure.
It is important to note that not all browsers support the same set of tags and attributes. Different development paths have lead to Netscape and IE implementing a slightly different set of features. There is a basic HTML subset in common but if you want your page to look the same on all platforms it is best to make sure that you are not using browser specific features. Browsers are designed so that if it finds a tag that it doesn't understand then it will ignore it or render it in the browser default manner.
As an example of how an attribute is set we might look at the <HR> tag. The <HR> tag is one of the few HTML tags that does not have a closing tag and is used to place a horizontal line (Horizontal Rule) across the browser window. By default the horizontal rule spans the containing element (window, frame, text column or table row) and is rendered as only three pixels deep. Eg;
<HR>
| Pixel |
Definition: The word "pixel" is an abbreviation of the term "picture element" and represents one "dot" on the monitor. If the resolution of your screen is set to 1024x768 then it is 1024 pixels wide by 768 pixels deep. In the <HR> example, above, if you look at the line displayed it has a grey line followed by a white line followed by another grey line each of which are 1 pixel deep (thick) making a total of 3 pixels. |
The attributes that may be applied to the <HR> tag are:
| Tag or Attribute | Example |
| <HR> | Horizontal Rule |
|
|
|
|
|
|
|
|
|
|
Attributes are expressed as name value pairs: AttributeName = "value". Eg;
Examples:
<HR color = "red">
(default alignment, default width)
<HR width="50%">
(default alignment, width = 50% of container)
<HR width="50">
(default alignment, width = 50 pixels)
<HR align="left" width="30%">
(alignment with left side of container, width = 30% of container)
<HR align="center" width="30%">
(alignment centre of container, width = 30% of container)
<HR align="right" width="30%">
(alignment with right side of container, width = 30% of container)
<HR size="10" width="25%">
(default alignment, width = 25% of container, height = 10 pixels)
<HR size="10" width="25%" NOSHADE>
(width = 25% of container, height = 10 pixels, no 3D shading)
<BODY>...</BODY>
The <BODY> tag has a number of attributes that determine how a web page is rendered and the appearance of some of the tags contained within it.
| Tag or Attribute | Example |
| <BODY> | Contains all text, images and other elements that are visible in the web page |
|
|
|
|
|
|
|
|
|
|
|
|
|
|
|
|
|
|
|
|
|
|
|
|
Examples:
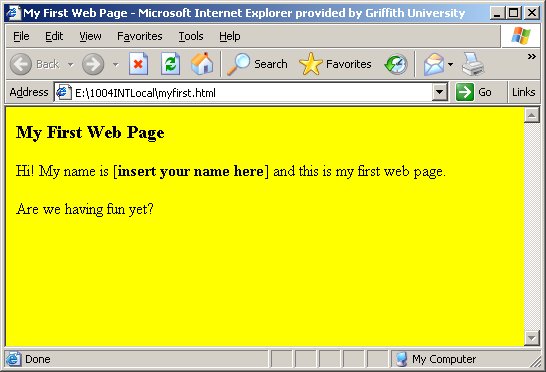
<BODY bgcolor="yellow">...</BODY>
(Set background colour to yellow)
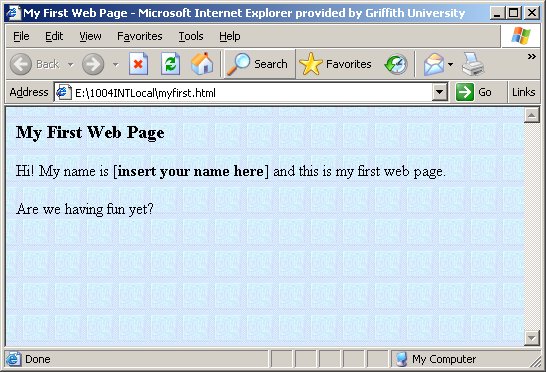
<BODY background="tiles.jpg"> ...</BODY>
(Set the background image to be "tiles.jpg" saved in the same directory as the web page)Or maybe:
<BODY background="images/tiles.jpg"> ...</BODY>
(Set the background image to be "tiles.jpg" saved in a subdirectory "images" of the folder with the web page)
<BODY bgcolor="black" text="white">...</BODY>
(Set the background colour to black and the text colour to white)

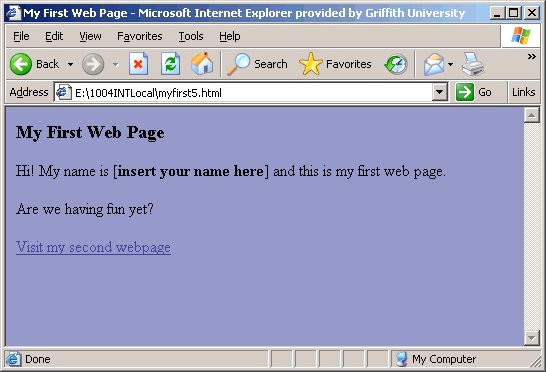
Exercise 2. Here we will create some hyperlinks and experiment with some other attributes of the <BODY> tag.
Open "myfirst.htm" in the text editor program and make the changes in italics, below:
<HTML>
   <HEAD>
       <TITLE>My First Web Page</TITLE>
   </HEAD>

   <!--make changes to the background colour, unvisited, visited and activated link colours-->
   <BODY bgcolor="#9999CC" link="#CCCC99" vlink="#444499" alink="#CC3333">
       <H3>My First Web Page</H3>
       <P>Hi! My name is [<B>insert your name here</B>] and this is my first web page.</P>
       <P>Are we having fun yet?</P>

       <!--create a hyperlink to a second web page using an "anchor" tag-->
       <A href="mysecond.htm">Visit my second webpage</A>
   </BODY>

</HTML>
Save "myfirst.htm" after you have made your changes and then also save the same file as "mysecond.htm" in the same directory as "myfirst.htm".
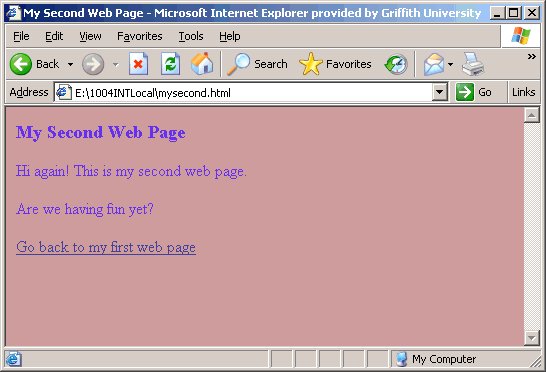
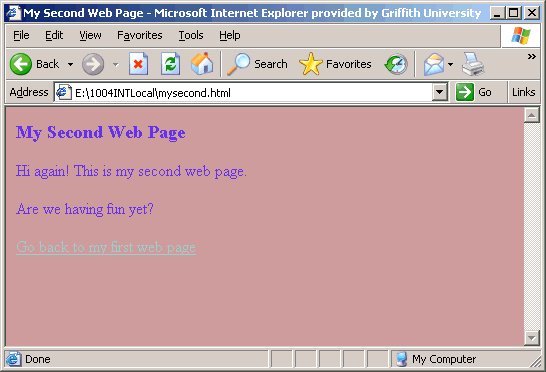
"mysecond.htm" should now be ready to edit. Make the changes in italics, below:
<HTML>
   <HEAD>
       <TITLE>My Second Web Page</TITLE>
   </HEAD>

   <!--make changes to the background colour, unvisited link colour and text colour-->
   <BODY bgcolor="#CC9999" link="#99CCCC" vlink="#444499" alink="#CC33CC" text="#6633EE">
       <!--Change the text appropriately-->
       <H3>My Second Web Page</H3>
       <P>Hi again! This is my second web page.</P>
       <P>Are we having fun yet?</P>

       <!--Alter the file name and link text to point back to the first page-->
       <A href="myfirst.htm">Go back to my first web page</A>
   </BODY>

</HTML>
Save "mysecond.htm".
Open "myfirst.htm" in your browser and take note of the following items:
|
|
 |
|
 |
|
|
 |
|
 |
|
|
|
Colour and the Web
Web Safe Colours and hexadecimal numbers
Colours in HTML are traditionally referred to in a six-digit RGB (Red, Green, Blue) hexadecimal number format. The first two digits specify the amount of red, the second specifies the amount of green and the third the amount of blue.
Two digit hexadecimal numbers have decimal values of between 0 and 255. As we are mixing colours from 256 different values of red, 256 different values of green and 256 different values of blue, it is possible to represent 256x256x256 = 16777216 different RGB colours in this format.
Most browsers will attempt to render the colour value that you specify. In some cases the browser will approximate by rendering it as the closest web safe colour. As different browsers may implement different colouring algorithms there is no guarantee that a colour will look the same in any two browsers.
Web browsers generally use a palette of 216 colours - this is known as the 'web safe palette'. The possible numbers are combinations of 00(least), 33, 66, 99, CC, FF(most) for each of R,G and B.
A web safe colour is any combination of three of these hexadecimal numbers:
The code #FFFFFF, for example, is white.
Red is #FF0000 (Red value is FF - the maximum, and Green and Blue are each 00 - the minimum).
Green is #00FF00
Blue is #0000FF
Red #FF0000 Green #00FF00 Blue #0000FF
Any code where all of the numbers are the same represents a shade of grey, black or white:
Black #000000 #333333 #666666 #999999 #CCCCCC White #FFFFFF
To lighten a colour (add white) simply raise equally the proportions of the other two colours:
Blue #0000FF #3333FF Light Blue #6666FF #9999FF Lightest Blue #CCCCFF
The Big List of Web Safe Colours
Here is an index of all 216 web safe colours and their hexadecimal codes. Simply copy the appropriate code into your <body> tag (link, alink, vlink etc) or your <font color="VALUE"> tag.
#FFFFFF #FFFFCC #FFFF99 #FFFF66 #FFFF33 #FFFF00 #FFCCFF #FFCCCC #FFCC99 #FFCC66 #FFCC33 #FFCC00 #FF99FF #FF99CC #FF9999 #FF9966 #FF9933 #FF9900 #FF66FF #FF66CC #FF6699 #FF6666 #FF6633 #FF6600 #FF33FF #FF33CC #FF3399 #FF3366 #FF3333 #FF3300 #FF00FF #FF00CC #FF0099 #FF0066 #FF0033 #FF0000 #CCFFFF #CCFFCC #CCFF99 #CCFF66 #CCFF33 #CCFF00 #CCCCFF #CCCCCC #CCCC99 #CCCC66 #CCCC33 #CCCC00 #CC99FF #CC99CC #CC9999 #CC9966 #CC9933 #CC9900 #CC66FF #CC66CC #CC6699 #CC6666 #CC6633 #CC6600 #CC33FF #CC33CC #CC3399 #CC3366 #CC3333 #CC3300 #CC00FF #CC00CC #CC0099 #CC0066 #CC0033 #CC0000 #99FFFF #99FFCC #99FF99 #99FF66 #99FF33 #99FF00 #99CCFF #99CCCC #99CC99 #99CC66 #99CC33 #99CC00 #9999FF #9999CC #999999 #999966 #999933 #999900 #9966FF #9966CC #996699 #996666 #996633 #996600 #9933FF #9933CC #993399 #993366 #993333 #993300 #9900FF #9900CC #990099 #990066 #990033 #990000 #66FFFF #66FFCC #66FF99 #66FF66 #66FF33 #66FF00 #66CCFF #66CCCC #66CC99 #66CC66 #66CC33 #66CC00 #6699FF #6699CC #669999 #669966 #669933 #669900 #6666FF #6666CC #666699 #666666 #666633 #666600 #6633FF #6633CC #663399 #663366 #663333 #663300 #6600FF #6600CC #660099 #660066 #660033 #660000 #33FFFF #33FFCC #33FF99 #33FF66 #33FF33 #33FF00 #33CCFF #33CCCC #33CC99 #33CC66 #33CC33 #33CC00 #3399FF #3399CC #339999 #339966 #339933 #339900 #3366FF #3366CC #336699 #336666 #336633 #336600 #3333FF #3333CC #333399 #333366 #333333 #333300 #3300FF #3300CC #330099 #330066 #330033 #330000 #00FFFF #00FFCC #00FF99 #00FF66 #00FF33 #00FF00 #00CCFF #00CCCC #00CC99 #00CC66 #00CC33 #00CC00 #0099FF #0099CC #009999 #009966 #009933 #009900 #0066FF #0066CC #006699 #006666 #006633 #006600 #0033FF #0033CC #003399 #003366 #003333 #003300 #0000FF #0000CC #000099 #000066 #000033 #000000
HTML Extended Colour Names
Most web browsers also support the representation of colours by their names. Having said that, there is no promise that each browser will render the colours the same way or render them at all.
The following is a table of colour names, their hexadecimal values and the colour that your current browser understands by that name.
Colour Name Hex. Colour aliceblue #F0F8FE antiquewhite #FAEBD7 aqua #00FFFF aquamarine #70DB93 azure #F0FFFF beige #F5F5DC black #000000 blue #0000FF blueviolet #9F5F9F brass #B5A642 brightgold #D9D919 bronze #8C7853 brown #A52A2A cadetblue #5F9F9F chocolate #D2691E coolcopper #D98719 copper #B87333 coral #FF7F50 crimson #DC143C cyan #00FFFF darkblue #00008B darkbrown #5C4033 darkcyan #008888 darkgoldenrod #B8860B darkgray #A9A9A9 darkgreen #006400 darkkhaki #BDB76B darkmgenta #8B008B darkolivegreen #4F4F2F darkorange #FF8C00 darkorchid #9932CD darkpurple #871F78 darksalmon #E9967A darkslateblue #6B238E darkslategray #2F4F4F darktan #97694F darkturquoise #7093DB darkviolet #9400D3 darkwood #855E42 dimgray #545454 dustyrose #856363 feldspar #D19275 firebrick #8E2323 forestgreen #238E23 gold #CD7F32 goldenrod #D8D870 gray #C0C0C0 green #00FF00 greencopper #527F76 greenyellow #93DB70 hotpink #FF69B4 huntergreen #215E21 indianred #4E2F2F indigo #4B0082 ivory #FFFFF0 khaki #9F9F5F lavender #E6E6FA lightblue #C0D9D9 lightcoral #F08080 lightcyan #E0FFFF lightgray #A8A8A8 lightgreen #90EE90 lightpink #FFB6C1 lightsteelblue #8F8FBD lightwood #E9C2A6 lime #00FF00 limegreen #32CD32 magenta #FF00FF mandarinorange #E47833 maroon #8E236B mediumaquamarine #32CD99 mediumblue #3232CD mediumforestgreen #7FFF00 mediumgoldenrod #EAEAAE mediumorchid #9370DB mediumseagreen #426F42 mediumslateblue #7F00FF mediumspringgreen #7FFF00 mediumturquoise #70DBDB mediumvioletred #DB7093 mediumwood #A68064 midnightblue #2F2F4F mintcream #F5FFFA mistyrose #FFE4E1 navyblue #23238E neonblue #4D4DFF neonpink #FF6EC7 newmidnightblue #00009C newtan #EBC79E oldgold #CFB53B olive #808000 orange #FF7F00 orangered #FF2400 orchid #DB70DB palegoldenrod #EEE8AA palegreen #8FBC8F paleturquoise #AFEEEE pink #BC8F8F plum #EAADEA powderblue #B0E0E6 purple #800080 quartz #D9D9F3 red #FF0000 richblue #5959AB royalblue #4169E1 saddlebrown #8B4513 salmon #6F4242 sandybrown #F4A460 scarlet #8C1717 seagreen #238E68 sienna #8E6B23 silver #E6E8FE skyblue #3299CC slateblue #007FFF snow #FFFAFA spicypink #FF1CAE springgreen #00FF7F steelblue #236B8E summersky #38B0DE tan #DB9370 teal #008080 thistle #D8BFD8 tomato #FF6347 turquoise #ADEAEA verydarkbrown #5C4033 verydarkgray #CDCDCD violet #4F2F4F violetred #CC3299 wheat #D8D88F white #FFFFFF yellow #FFFF00 yellowgreen #99CC32
View the table above with different browsers to see the difference in colour name implementations.
Characters, Fonts and Text Styles
HTML includes tags that affect the appearance of text down to the detail of individual characters in the web page. Character tags can be classified as either logical or physical.
Logical character tags indicate how text is to be used rather than how it is to be displayed. As with colours, there is no guarantee that any two browsers will render the text in exactly the same way.
Character Tag Description <EM> The text enclosed is emphasised in some way. In most cases this is with italics. eg: EM <STRONG> The text enclosed is to be strongly emphasised. In most cases the text is bolded. eg: STRONG <CODE> Used to display a sample of programming code. In most cases this is achieved using a monospaced font such as Courier. eg: CODE<KBD> Used to indicate text that should be entered by the user. In most cases this is achieved using a monospaced font such as Courier. eg: KBD <VAR> Indicates a variable value and often appears as italics or underlined text. eg: VAR <CITE> Indicates the use of quotes or citations and often appears as italics. eg: CITE
Physical character tags indicate exactly how tags are to be formatted.
Character Tag Description <B> Indicates that enclosed text should be displayed in bold <I> Indicates that enclosed text should be displayed in italics <TT> Indicates that enclosed text should appear in a "teletype" monospaced font such as Courier <BIG> Indicates that enclosed text should appear in big font. <SMALL> Indicates that enclosed text should appear in small font. <SUB> Indicates that enclosed text should appear as subscript <SUP> Indicates that enclosed text should appear as superscript <S> Indicates that enclosed text should appear with a horizontal line through it as if "struck out"<U> Indicates that enclosed text should appear underlined <FONT>...</FONT> Controls the appearance of the text enclosed as indicated by the values of the attributes appearing in the tag. <A>...</A> The "Anchor" tag indicates that the text (or graphic) enclosed is to be used as a hyperlink. The attributes of this tag set the properties of the hyperlink Specifies the reverse relationship between the current page and the page specified by the HREF property
Fonts are styles of lettering such as have been used in paper-based printing and later in applications such as desk-top publishing and word processing. Fonts belong to families based upon their characteristics such as character spacing, character width (proportional or monospaced) and use of serifs (caps on ends of vertical sections of letters).
Font family examples Arial, Helvetica, san-serif Times New Roman, Times, serif Courier New, Courier, mono Georgia, Times New Roman, Times, serif Verdana, Arial, Helvetica, sans-serif Geneva, Arial, Helvetica, sans-serif
Each browser will have access to a basic set of fonts and any downloadable fonts that have been made available to the operating system. If a browser is asked to render a font that it does not have information for then it uses the default font (Times Roman) or the closest available in the same font family.
Assessment Activity:
- Create a new html page in a new directory, as "myfirst.htm" (or myfirst.html)
- Open the directory and double click on the file to execute the default
browser to view the file. It should look something like this:

Last Edited: 10 January 2011 By: Heather Gray |