1008ICT Business Informatics
Module 6 - Designing Information
Creating information from data
Learning Outcomes: |
|
Additional Material
IMPORTANT - Check out the slides down in the resources section! We will be covering the first set of slides in the lectures/Workshops.
Importance of the Database
Databases are the most important software application in the world today. Yep! It is a big call but with very little thought you might possibly see how true that is. This is mostly due to the large emphasis business puts on managing and accessing corporate data. Efficiency in accessing, analysing and converting data into business information is what creates a commercially competitive edge.
BC, that is Before Computers, business data was kept in ledgers, accounts books, files and filing systems. Administrative employees would access the records manually, analyse them and then interact with other entities appropriately. The human-paper-human process is very slow compared to computerised database applications and this is where huge corporate efficiencies have been realised.
Making relevant information accessible to suppliers, business partners and potential customers in a timely manner, provides a service that enables business to progress without stalling to wait for communication to happen. In the university context, students can manage enrolments, update personal details, check timetables, access resources and do a range of other things using the university's information system. Information is tailored for a particular user by accessing their records in one or more databases.
Entities
What are the things that most businesses keep track of? Customers, employees, members, subcontractors, orders, products, suppliers, service providers, assets, parts and many others are all "entities" that businesses might keep records of.
Now there is a relevant word: "Records". If you needed to keep track of many different entities of a particular type, like say: "students" it is important that there is enough relevant information for the business process to work and that each individual entity is uniquely identified. This data is held in a "record" that has the same structure for each individual. Here is an example of a student record:
Student Number: 1210011
Family Name: Kostafides
First Name: Robert
Street Address: 27 Anglesea Crt
Suburb: Coombabah
Postcode: 4123
State: QLD
Country: Australia
Phone Number: 0755341235
Mobile Number: 0412347568
Highest Qualification: Master of Applied Science
Issuing Institution: Griffith UniversityFor the university it is not enough to use a student's name as the identifying piece of data. There may well be more than one "John Smith" in the university so that is why unique values like "student numbers" are issued to each new student. These unique values become "key" values for indexing, sorting and managing records. Otherwise they are used for ensuring that transactions are carried out for the right entity.
In the university there are things like: employee records, enrolment records, timetabling records, computer lab allocation records, academic records and many other things. Each of a particular type of record is stored in a file or a table. In this case students in a Student Table, employees in a Employee Table, enrolments in a Enrolment Table and so on.
Some of the data in different tables is related. A student for example, appears in a student record but also appears in a tutorial enrolment record and also an academic record. In database applications these tables are related through the "key fields". In this case the Student Number and maybe the Family Name would identify the student in each table. This is the only information that needs to be shared between the tables in order to get access to all of the rest of the information in each of the tables.
Relationships
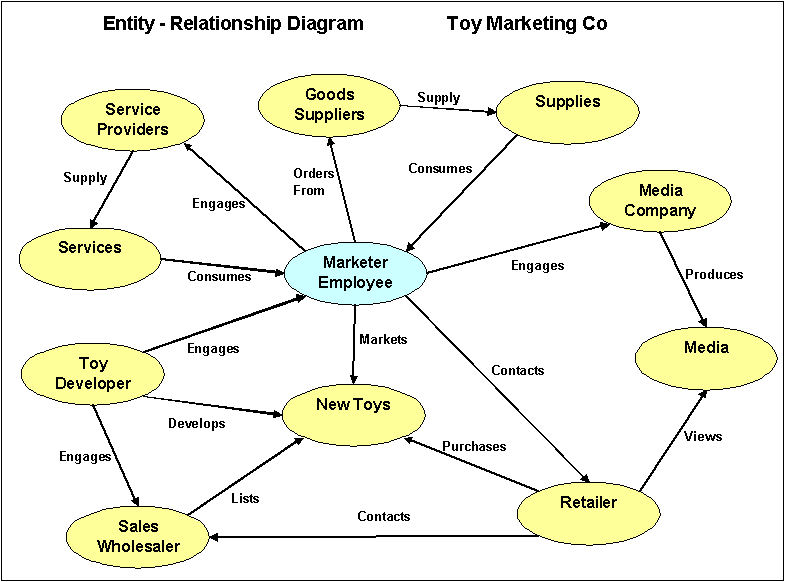
In a toy marketing business the simple relationships between the entities may look something similar to this, where the "entities" are represented by the oval shapes and the relationships between them are depicted by the connecting arrows. In this example there is no indication of the numerical nature of the relationships.
In a database application like MS Access each entity type is represented by a table and the relationships between the entities are represented as relationships between tables. E-R diagrams and Use-Case diagrams are business modelling tools that help the database designer to create the correct tables and relationships.
Entity-Relationship Diagram #1
There are very few entities within an organisation that do not perform some action or have some action performed upon them. For example in the university:
University timetables Tutorials
Students enrol in Tutorials
Tutors instruct Tutorials
Tutorials are held in Laboratories
Laboratories contain Computers
Students use Computers
These are called Use-Cases and they indicate the nature of the relationship between entities. If we add the notion of "cardinality" (numbers of entities relating) we start to gain information about the complexity of the interactions.
Entity Relationships 1 University timetables N Classes 1-to-many M Students enrol in 1 Tutorials many-to-1 1 Course employs N Tutors 1-to-many 1 Tutors instruct N Tutorials 1-to-many M Tutorials are held in N Laboratories many-to-many 1 Laboratory contain N Computer 1-to-many 1 Students uses 1 Computer 1-to-1
In the table above we can see that each student enrols in a number of tutorials and computer labs. Each learning facilitator is allocated to instruct a number of tutorials and computer labs. If we wanted to find out what learning facilitator a particular student had for a particular tutorial or computer lab we would need to know how these different entities were related. We need a system of relationships to help us create information.
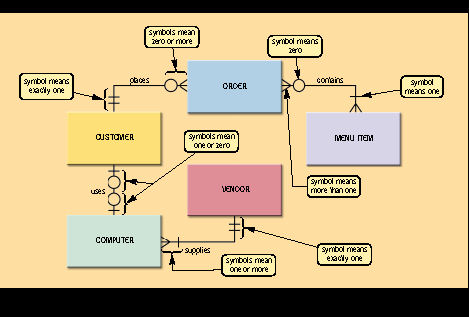
Entity-Relationship Diagram #2
Image from: Shelly, Cashman & Vermaat: Discovering Computers 2006
Relational database applications like MS Access allow us to create such relationships. The most important steps in the database design are:
- Identifying the entities involved - both humans and objects
- Expressing the relationship between the entities as a "verb" (creates, consumes, orders, buys, etc)
- Creating a table for each entity
- Creating a relationship between tables for each relationship identified in the E-R diagram or other modelling process.
Think of what tables and relationships you might create for your project database.
Database terms and definitions
Data
- The raw material or basic facts used by information systems
- A collection of unprocessed items, which can include text, numbers, images, audio and video
Database
- Collection of data organised in a manner that allows access, retrieval and use of that data
Database System
- A database system consists of linked data files, also called tables, that form an overall data structure. Compared to file processing, a database environment offers greater flexibility and efficiency.
Database Management System - DBMS
- Application software that allows a user to:
- create a computerised database;
- add, change and delete data in a database;
- sort and retrieve data from a database; and
- create reports using the data in the database
Distributed Database Management Systems - DDBMS
- A system for managing data stored at more than one location.
- A DDBMS offers several advantages:
- data stored closer to users can reduce network traffic;
- system is scalable so that new data sites can be added without reworking the system design;
- with data stored in various locations, the system is less likely to suffer catastrophic failure
- A potential disadvantage of DDBMS is data security as it can be harder to maintain controls and standards when data is stored in various locations
Data Integrity
- Refers to the validity of data.
- Data integrity can be compromised in a variety of ways:
- human errors when data is entered
- errors that are created when data is transmitted from one computer to another
- software "bugs" or viruses
- hardware malfunctions such as disc crashes
- natural disasters such as fire or flood
Data Security
- Data security protects data from loss or damage and recovers data when it is lost or damaged (error recover & fault tolerance through redundancy).
- Information security ensures that data is not visible to an attacker/hacker while stored or in transmission over a network (encryption)
- Information security ensures that only authorised users have access to corporate data and operations on that data (authentication)
- Information security ensures data integrity
- Computer security ensures that authorised users have access to corporate hardware and any data that it contains (authentication)
Data Redundancy
- Data redundancy occurs when data common to two or more information systems is stored in several places.
- Disadvantages of unmanaged data redundancy are:
- Increased storage space requirements
- More complex data maintenance
- More costly data updating and maintenance
- Disadvantages of unmanaged data redundancy are:
- Data redundancy can be used as a feature for improving information system safety
- Advantages of manged data redundancy are:
- Faster access to local data
- Reduced wide area network traffic
- Ability to rebuild lost data
- Ability to maintain data access during system maintenance
- Advantages of manged data redundancy are:
Group Tutorial: An introduction to MS Access
Computer Lab ExercisesWeek 8You are about to start designing a database system from which will run your project business. In this week's exercises you will identify the "entities" that exist in your project business. Entities are people, roles, objects and things that have a definable relationship with other entities within the business. If it helps think of what each of the people that interact in and with your business do and the people and objects that they interact with. This is very like the "Entity-Relationship" diagrams that we have seen in lectures/workshops and is the key to starting the database design for your project.
Remember to “back up”. Have you got a copy of all of the files that you created on both your USB and network drives? Week 9If you have completed last week's tasks you will have generated some general classifications of "entity" that exist within and interact with your project organisation. To give you a bit of a clue most projects might have the following entities that you would want to keep records about:
The lists above are only an idea and may be a bit different in your project. I am sure that you get the idea. Now we are going to start designing a database using your basic three entities. In most cases this will be Employees, Suppliers and Supplies or something similar. It is important to note that there are relationships between these basic entities. Obviously supplies have to come from a supplier so each supply or inventory item has a supplier code associated with it. Suppliers are usually contacted by a particular employee and have a working relationship so each supplier record might have a contact employee code.
Week 10You should have at least 3 tables designed and partially populated with sample data before you start this stage. For the basic three tables; suppliers, product and employees there should be some common elements. Each product in the product table should have a field that contains a supplier id number. The supplier id is the unique code that you entered as the first element of you supplier table. In this way we have a link oro shared value between the tables. Similarly the supplier table has an entry that is the employee contact id that identifies the employee that usually places the orders with that supplier. Other links between tables might be realised if a recipe table links to the product table through product codes or a patient's record links to a drug id with several other possibilities. Make sure that your product table has fields that show the current stock of the item and the reorder point of that item.
Remember to “back up”. Have you got a copy of all of the files that you created on both your USB and network drives? NB: Save your finished database with tables, queries, forms and reports on your website. Resources List:
|
||||||||||||||||||||||||||||||||||||||||
Updated by Heather Gray Feb 2011 |